Shopify back-in-stock email notifications: the complete setup guide
Sick of losing customers and revenue to stockouts? Then it’s no surprise you want to know how to send back-in-stock emails. And you’re in the right place, because this article shares everything you need to know about Shopify back-in-stock emails, including:
- Why back-in-stock emails are essential to Shopify store success
- How to set up back-in-stock emails in four easy steps
- Four ways to optimize back-in-stock campaigns for maximum revenue recovery
Let’s get into it…
Looking for real-world templates and subject line examples rather than a setup guide? Skip ahead to our roundup of 15+ proven back-in-stock email examples →
Why back-in-stock emails are critical for your Shopify store
In an ideal world, when a customer stumbles upon an out-of-stock product, they’d simply wait patiently until it returns – then buy it.
Sadly, in reality, there are thousands of other stores in your niche. If you can’t give the customer what they want right now, they’ll look elsewhere (and likely never return). Indeed, studies show that…
- Two-thirds of consumers will leave an ecommerce site or store and buy from another retailer when an item they’re looking to purchase is out of stock (source)
- Retailers are missing out on nearly $1 trillion in sales through stockouts (source)
- 73% of consumers feel less loyal to retailers after experiencing product unavailability (source)
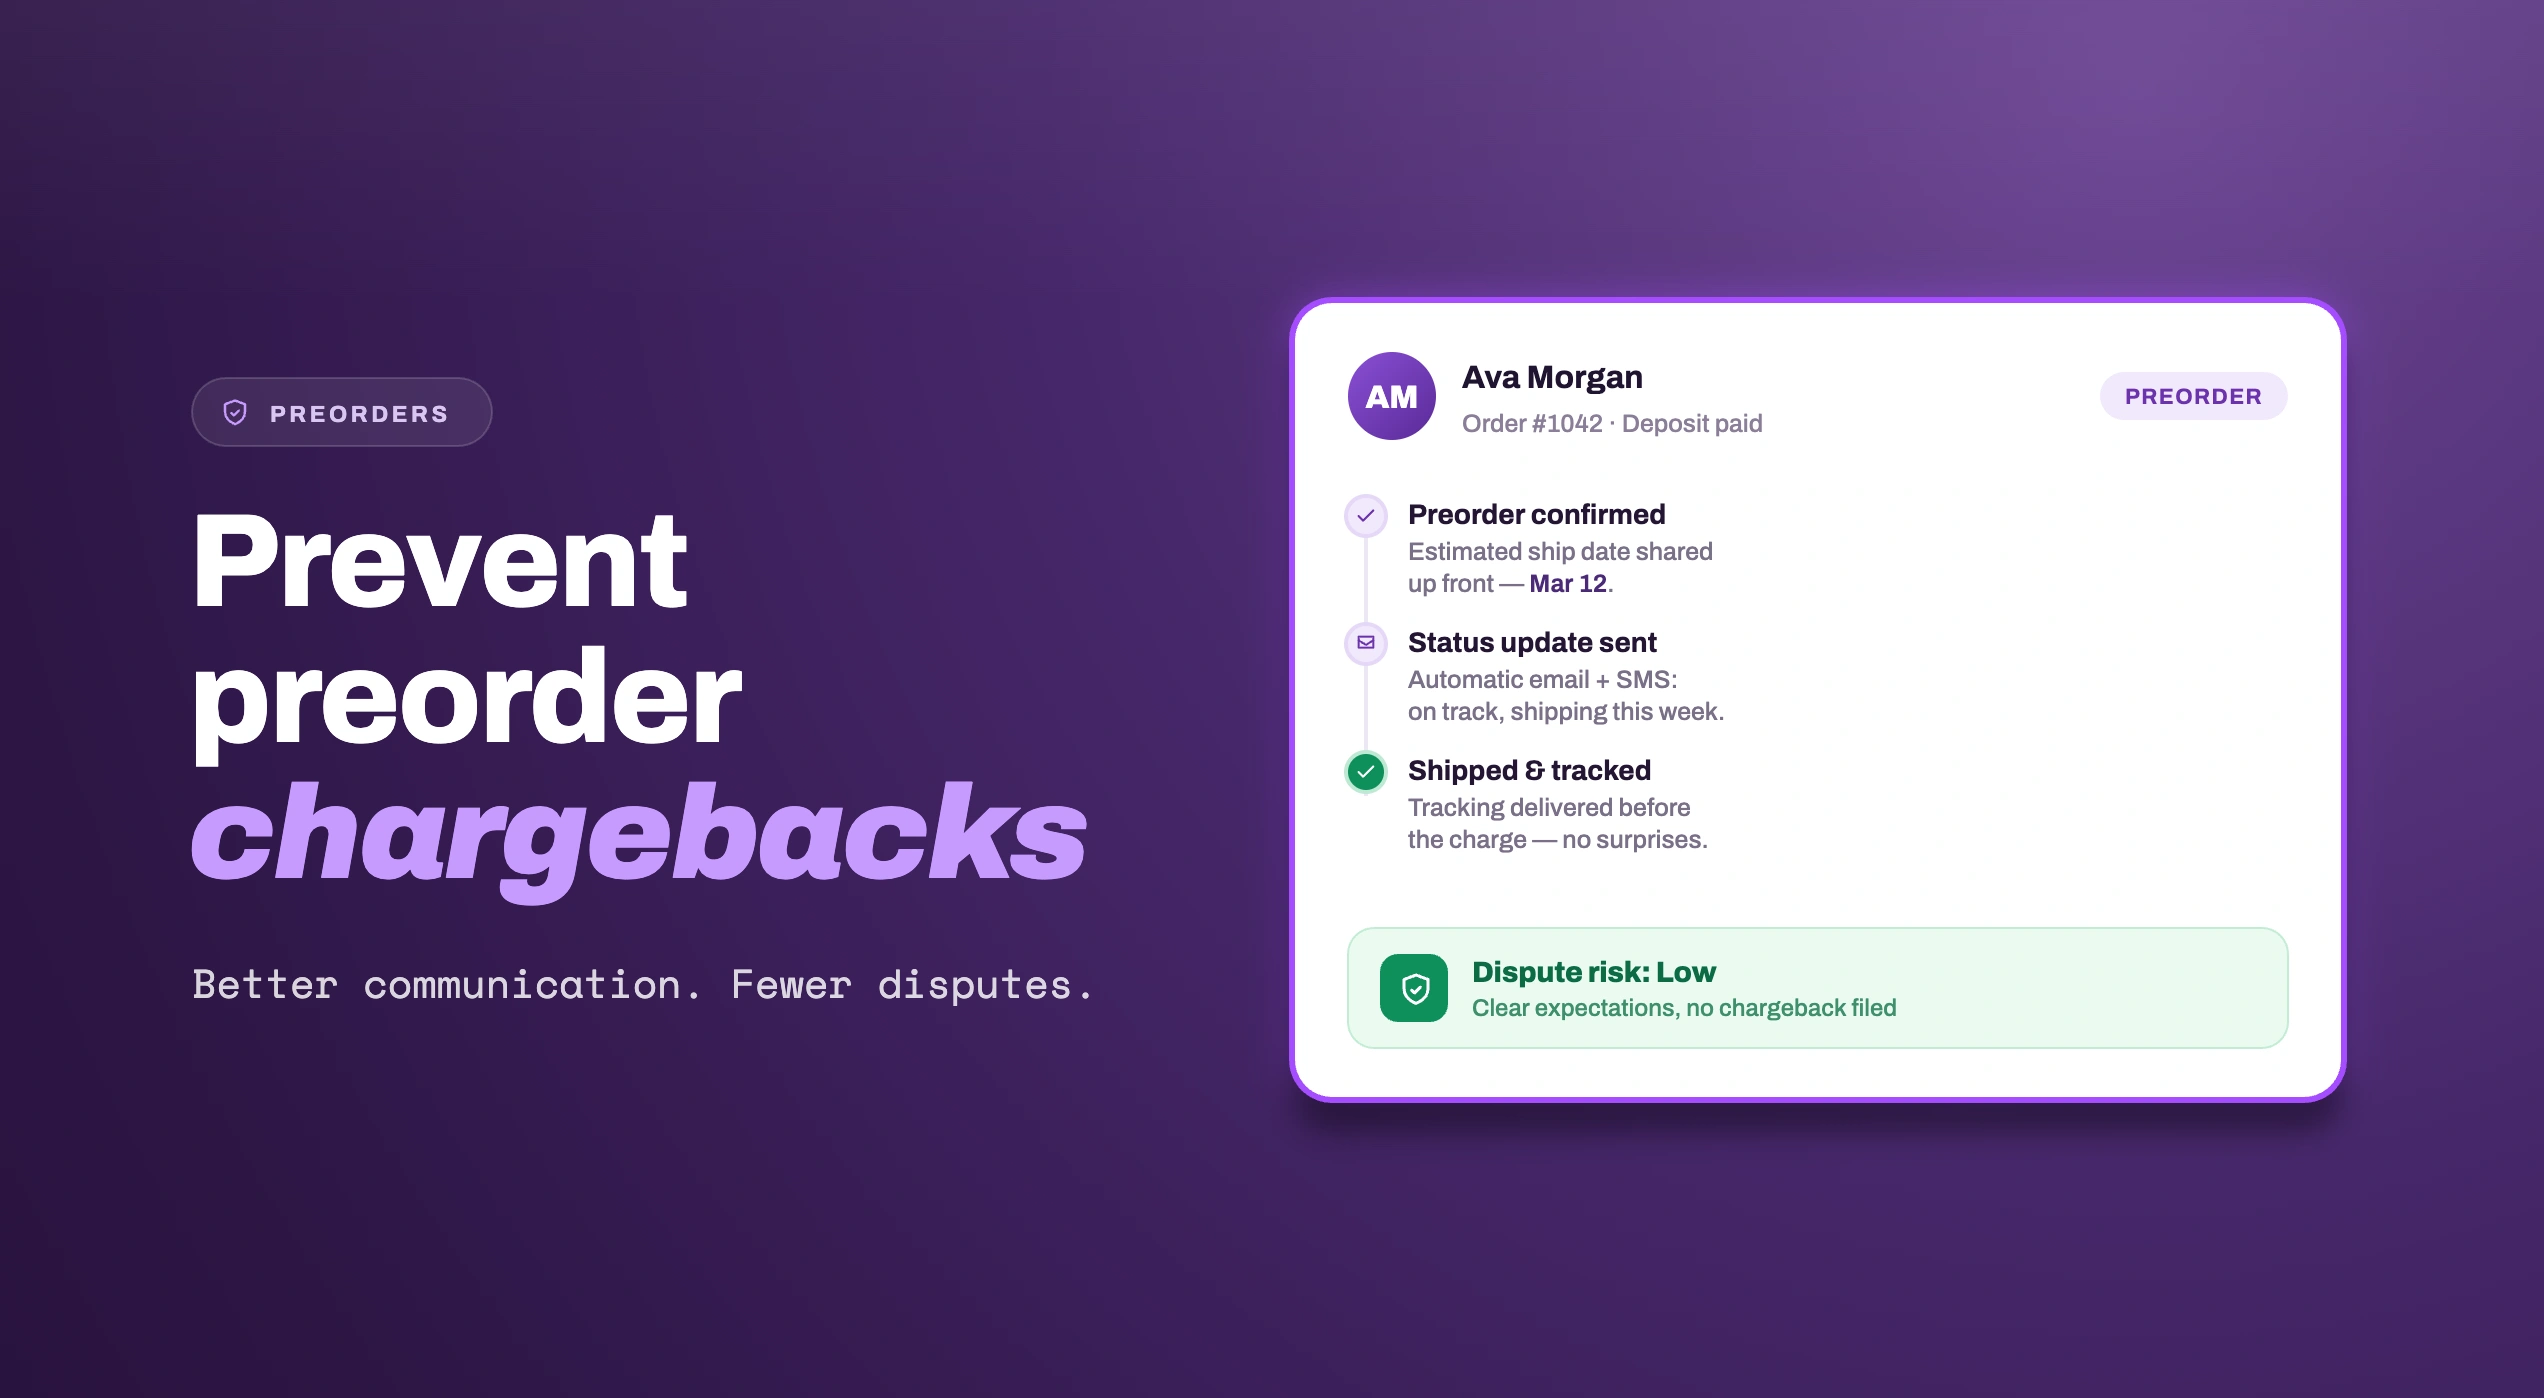
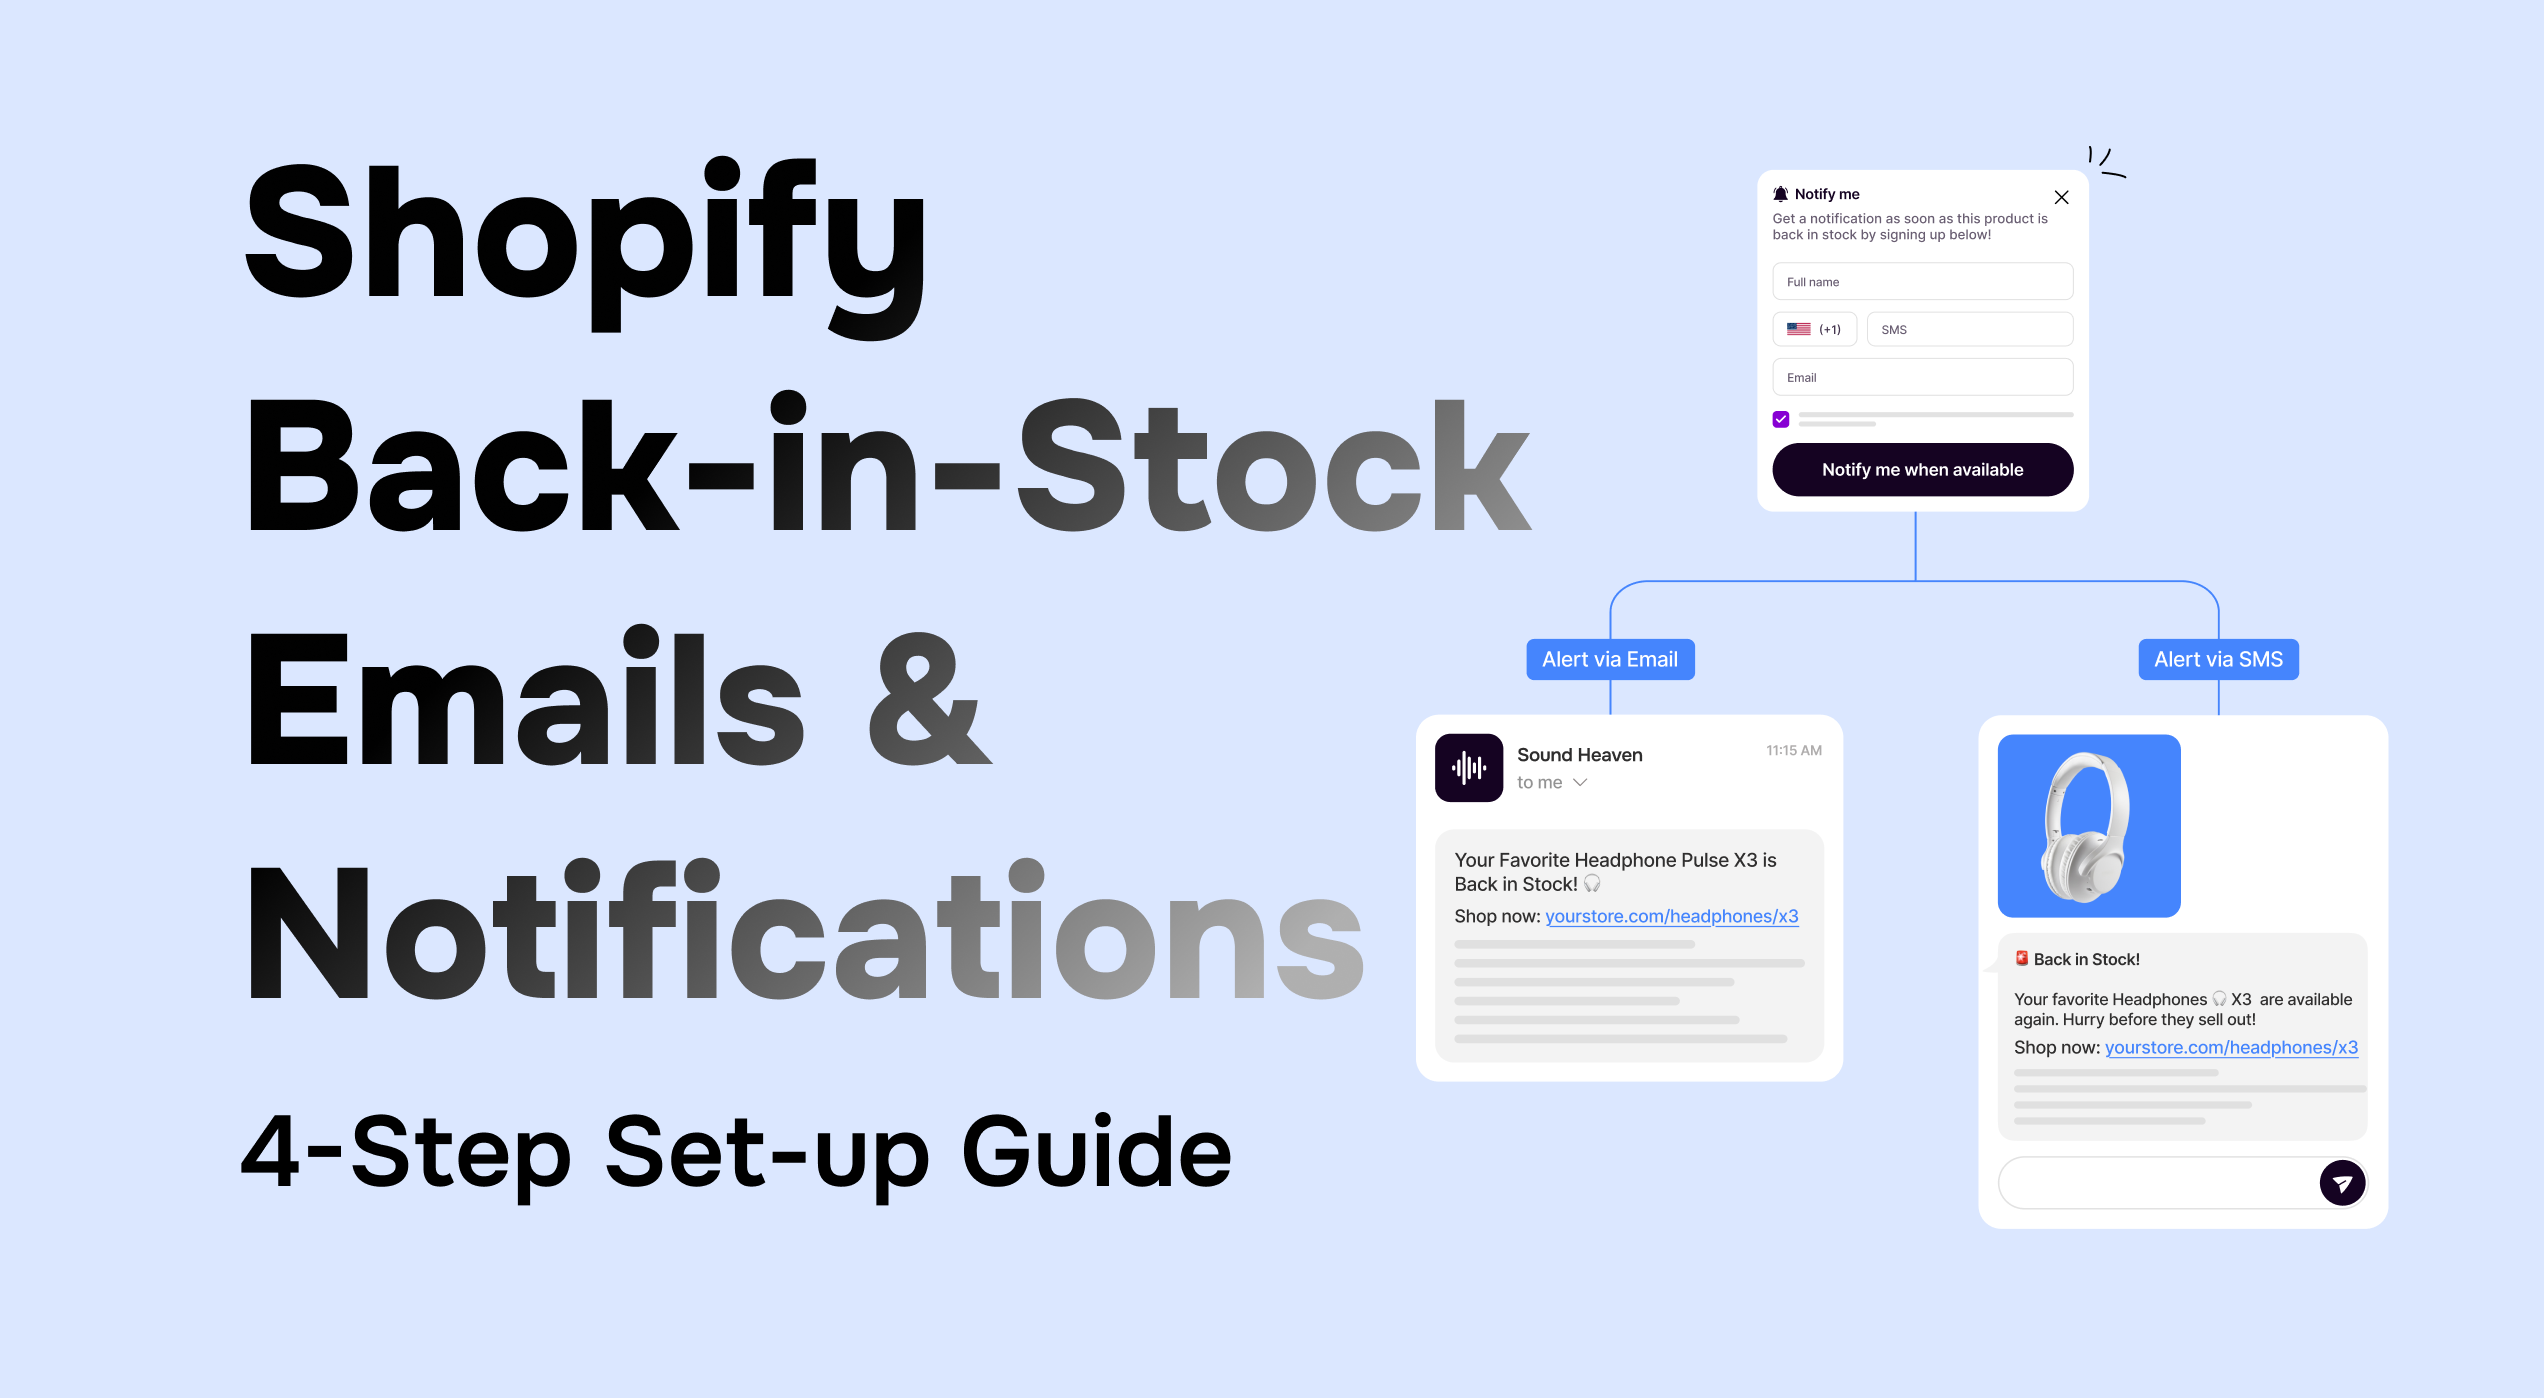
Stockouts are a fact of life for many Shopify merchants. But rather than shrugging at all that lost revenue, get proactive by letting customers sign up for back-in-stock notifications. It’s simple – they click a “Notify me” button on an out-of-stock product page and share their contact details then they get notified by email or SMS when the item comes back in stock (including a link for them to return to your store and buy). That way, you get to win back a chunk of revenue that would otherwise have been lost.
These campaigns are so effective because shoppers actively sign up to them, so they’ll be looking out for your email in their inbox. Which explains why back-in-stock emails see an average open rate of 65.32% – that’s almost 70% higher than the poorest-performing campaign type.
Challenges of sending back-in-stock emails with Shopify
Given the obvious value of back-in-stock emails, you might assume Shopify would offer them as a native feature – or at least as a function of its dedicated email marketing app, Shopify Email.
Sadly, it’s not quite that simple. Shopify lacks a built-in system for:
- Capturing signups (there’s no default “Notify Me” widget)
- Automatically sending alerts when inventory is replenished
And while you can technically customize notification templates in Shopify’s back end and send manual back-in-stock notifications via Shopify Email, it’s tedious and totally unscalable.
Realistically, if you’re going to enjoy the benefits of back-in-stock emails, you’re going to need a dedicated back-in-stock alerts app like STOQ. With STOQ, Shopify inventory data is transformed into a complete, no-code back-in-stock notification system incorporating
- Waitlist capture
- Automated email and SMS sequences
- Conversion-focused alerts
all with zero dev work.
Need to communicate with customers during an active stockout — before they sign up for notifications? See: How to tell a customer an item is out of stock (+ email templates) →
Step-by-Step: Shopify back-in-stock email setup with STOQ
Ready to start recapturing revenue lost through stockouts? You can get up and running with STOQ in a matter of minutes, with no coding skills or dev work required. Start out on our free plan – no credit card needed – then upgrade when you need higher sending limits.
Here’s how to do it…
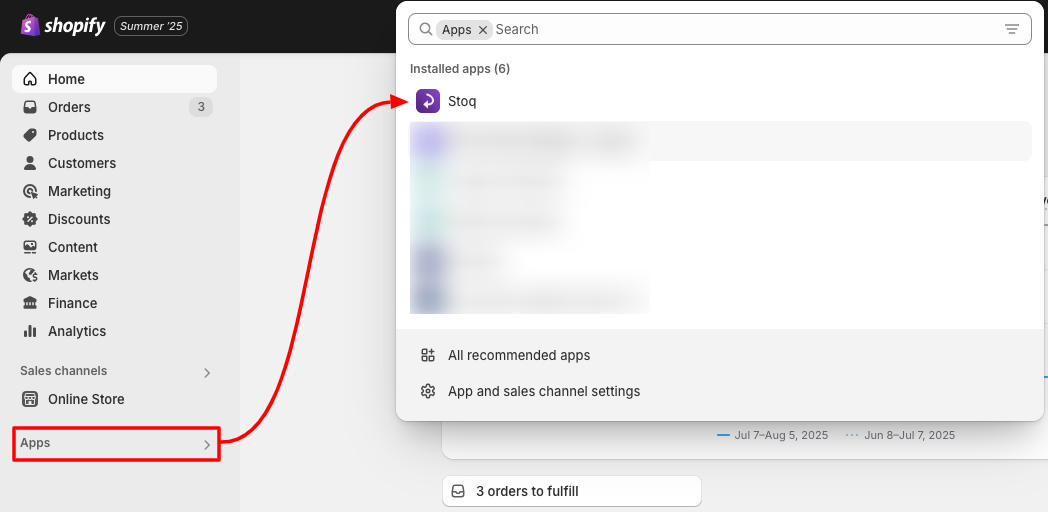
1. Install STOQ
The first step is to install the STOQ app. Just visit the STOQ page on the Shopify App Store, hit “Install”, and follow the on-screen steps to set up your free account. Easy!
Once installed, you can find STOQ by clicking Apps in your Shopify admin:
2. Create your signup widget
Before you start sending back-in-stock emails, you need a way to collect registrations from interested shoppers who want to be notified when products return to stock. STOQ gives you two ways to do this:
- “Notify me” button + back-in-stock popup
- Embedded back-in-stock notification form
We’ll walk you through how to capture registrations via “Notify me” button, but it’s just as simple to do it via embedded form:
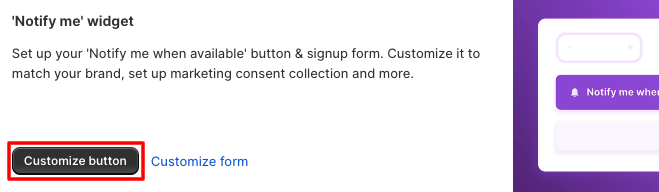
- Click STOQ in the Apps section of your Shopify admin and navigate to Back in stock alerts > Signup widget.
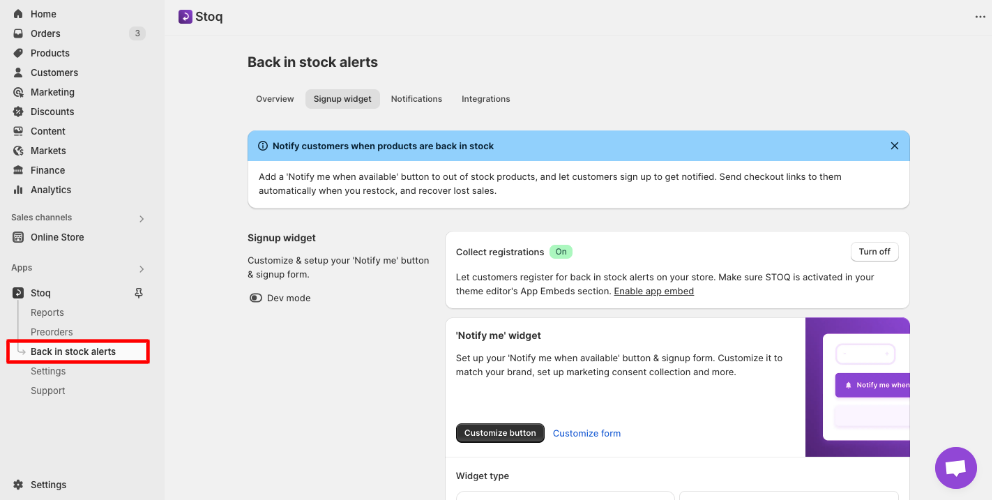
- Scroll down to the section titled 'Notify me' widget and click Customize button.
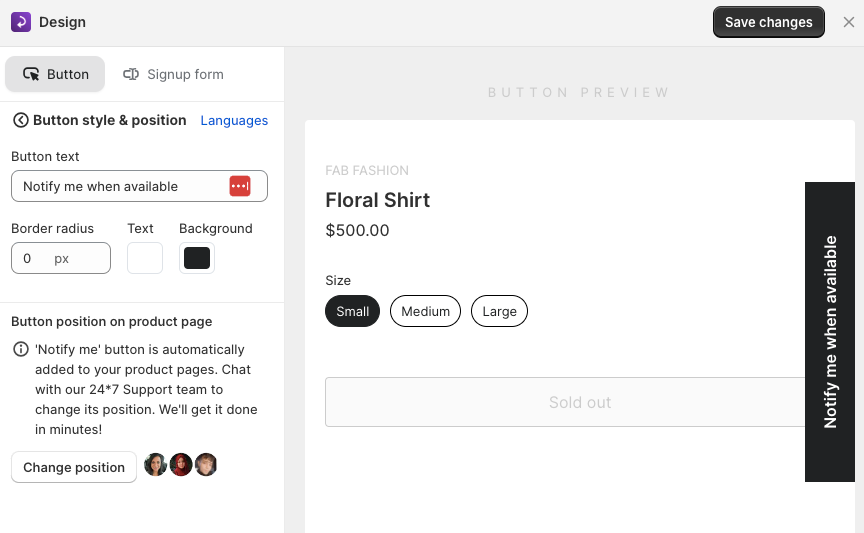
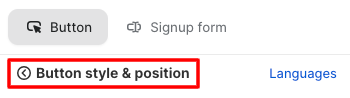
- From the Design window, click Button style & content to edit your button copy, set your desired border radius, and change the text and background colors. See your changes in real time in the preview window.
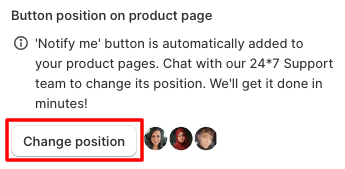
- Optionally, to change the button position on out-of-stock product pages, click Change position to chat with our 24/7 support team – they’ll handle all the technical stuff for you!
- Click the back button to head back to the main Design window…
- …then click Products to choose whether to display the button on all out of stock products or only on specific products (based on product tags).
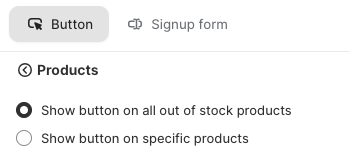
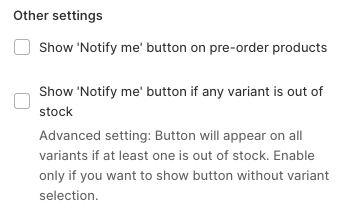
- Optionally, choose to show your “Notify me” button on pre-order products and/or on products with out-of-stock variants.
- Finally, when you’re happy with the design of your “Notify me” button, click Save changes.
3. Choose where your “Notify Me” button appears
Back on the main Back in stock alerts page, you can choose the types of pages on which your new “Notify me” button will be displayed. It’ll automatically appear on relevant product pages, but you can also add it to three other page types:
- Home page
- Collection page(s)
- Search page
To enable your “Notify me” button on one or more of those pages, check the relevant box under the Pages section:

Pro tip: Built custom collection and/or product pages? Speak to our support team about setting up an integration for your “Notify me” button.
4. Customize your back-in-stock notifications
STOQ lets you create automated back-in-stock sequences featuring up to three messages (either email or SMS). That way, interested customers are automatically notified when a product returns to your inventory.
Here’s how to set up automated back-in-stock emails sent through STOQ:
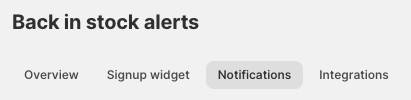
- From the main Back in stock alerts page, click Notifications.
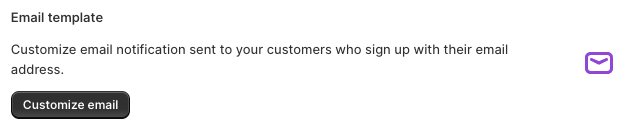
- Scroll down to the Email template section and click Customize email to open the template editor and start editing the first email in your sequence, which is sent automatically when you restock.
- Click Address to set your “from” name and sending email address. Bear in mind your email must be DKIM-authenticated – if not, emails will be sent from our own domain. Optionally, you can also add your store’s logo to your email template.
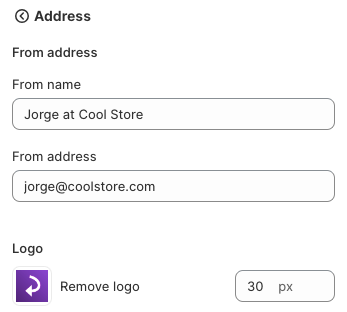
Pro tip: Keep an eye on the live preview image to check the impact of any changes you make.
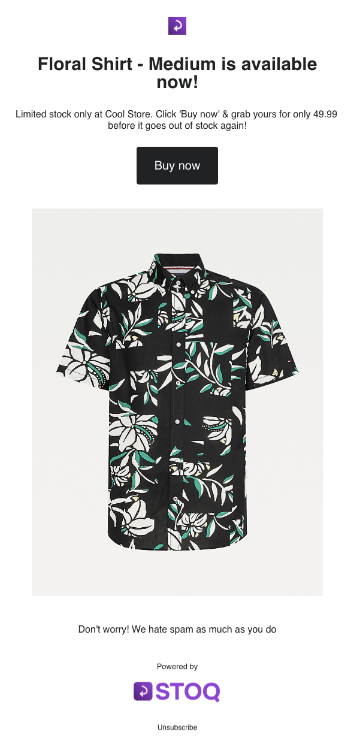
- Navigate back to the main template editor screen, then click Content to edit your email subject line, preheader, heading, and description (or simply stick with the defaults).
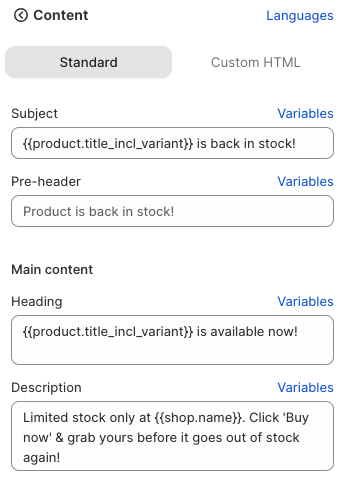
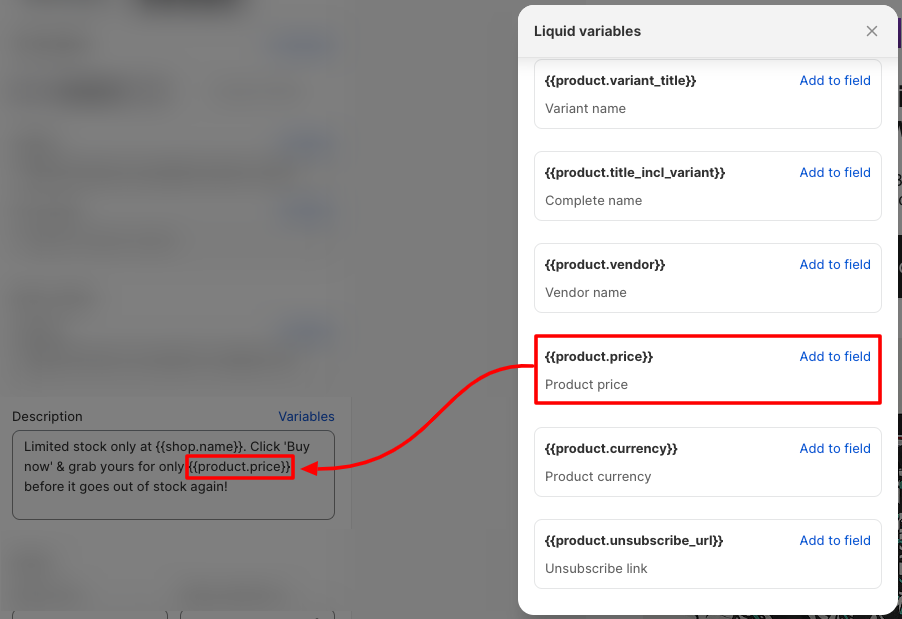
- Optionally, customize your text fields with Liquid variables by clicking Variables next to your desired field, finding the specific variable you want to add, then clicking Add to field. Choose from over a dozen options, including store name, customer name, and product price.
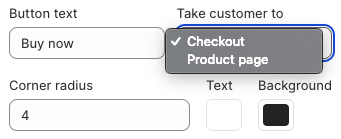
- Still in the Content editor, scroll down to the Button heading to edit your button text, color scheme, corner styling, and the page you want customers to land on (either the relevant product page or your store’s checkout).
- Scroll down to the Footer section to edit your footer text and choose whether to display the default “Powered by STOQ” watermark.

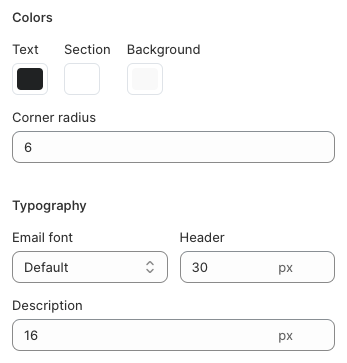
- Click back to the main template editor screen again and hit Colors & styles to edit – guess what? – the colors and styles of your email template. This includes your text and background color, corner radius, and font style and size.
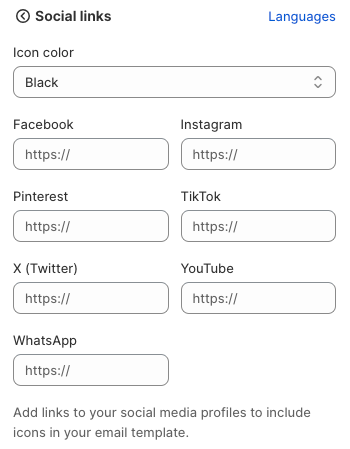
- Once again, click back to the main template editor screen, then click Social links to add links to your social channels and choose whether social icons appear in black or white.
- Then click Save to update your email template and hit Send test email at the bottom of the screen to make sure everything works as expected.
Now, close the template editor to return to the Notifications screen.
From here, scroll down to Settings, where – if you like – you can edit the minimum restock quantity to trigger your back-in-stock sequence.
Finally, head back to the top of the editor to edit the second and third emails in your back-in-stock sequence. You can either turn them off completely…
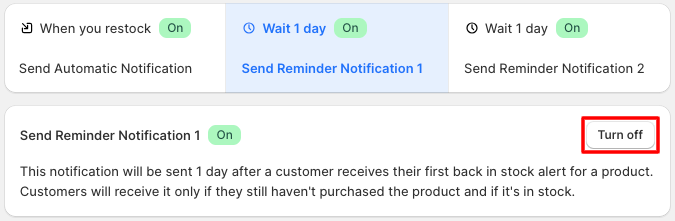
- …or repeat the steps laid out above to customize your email templates. Plus, in the Settings section, you can set your preferred wait length between sequence steps.

Full disclosure – this walkthrough barely scratches the surface of STOQ’s functionality. There’s a ton of stuff we haven’t covered here, from setting up Shopify Market-based alerts to creating SMS sequences to accessing advanced analytics on product demand.
Instead, we’ve given you the absolute essentials – follow these four steps to get your first back-in-stock email sequence up and running in minutes!
Pro tip: Run your email campaigns through Klaviyo? Use STOQ’s Klaviyo integration to trigger back-in-stock alerts directly in Klaviyo – using your own branded templates and full analytics support. Learn more: Send automatic back-in-stock alerts with STOQ's Klaviyo app
Tips to optimize your back-in-stock email campaigns
Now you know how to set them up, let’s look at some tried-and-trusted best practices to boost revenue generation from your back-in-stock campaigns:
1. Promote urgency and scarcity
Urgency and scarcity drive immediate sales. The good news is, this messaging is baked into back-in-stock emails – the customer already knows the product is in high demand because they had to sign up for restock notifications!
However, you can always do more. Try emphasizing urgency and scarcity with phrases like:
- Act fast before it sells out again
- Don’t sleep on this
- While stocks last
Shoppers act fast when they feel in real danger of missing out – which means higher conversion rates and more revenue for your store.
Want copy inspiration? See our roundup of 15+ back-in-stock email examples with proven subject lines →
2. Leverage personalization and segmentation
Back-in-stock emails are always personalized because they’re promoting a product that the recipient is definitely interested in. Otherwise, they wouldn’t have signed up in the first place.
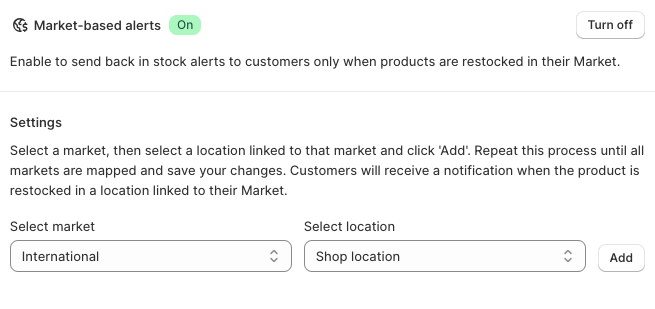
But there’s more you can do to create a personalized customer experience. For instance, with STOQ’s Shopify Markets beta, you only send back-in-stock alerts when a product is restocked in the customer’s home market – perfect for stores serving multiple territories.
Also, try segmenting your back-in-stock waitlist. For instance, for products with limited inventory and high demand, segment customers by lifetime value – then prioritize sending restock emails to top spenders. Tell them they’re first in line to buy the restock; it’ll make them feel special.
3. Nail email timings and follow-up frequency
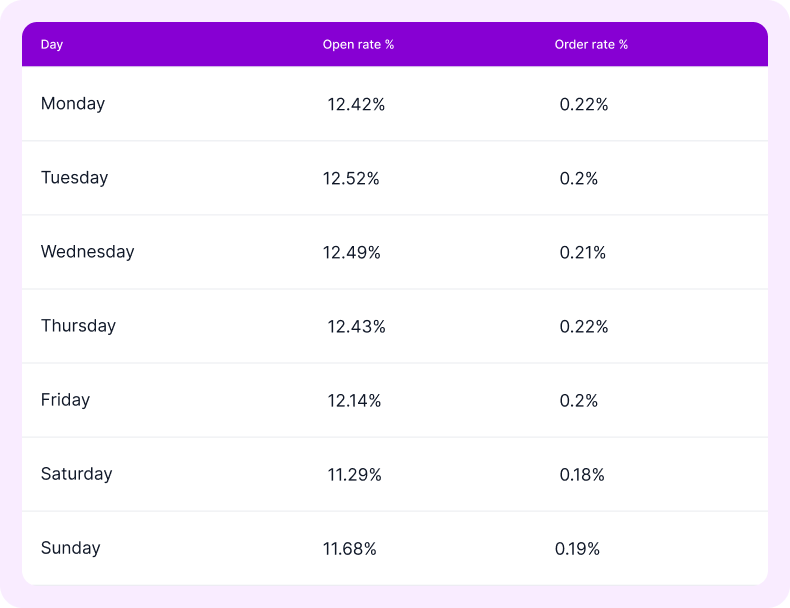
Sending times and cadences have a big impact on campaign success. There’s plenty of research on the best times to send emails. For instance, Klaviyo says Wednesdays and Thursdays are generally the highest-performing days for email opens, while Mondays and Thursdays are best for order rates.
As for the ideal sending frequency, your goal is to drive action without customers feeling like they’re being bombarded with constant emails.
By default, STOQ uses the following cadence:
- Email #1: Sent automatically when you restock the product from Shopify admin
- Email #2: First follow-up, sent the day after the initial email
- Email #3: Final follow-up, sent 24 hours after email #2
But, as with anything in ecommerce, we strongly advise seeing what works best for your audience rather than basing decisions on third-party data.
4. Incentivize restock purchases
Not every customer will buy after receiving a couple back-in-stock emails. Some require a little extra nudge.
For that reason, consider including an incentive in the final email in your sequence. One simple way to do this in STOQ is to add a code for free shipping or a percentage-off discount to your email template, like this:
Next steps
Back-in-stock emails are one of the most effective ways to boost your store’s bottom line. Think about it: you’re targeting customers who would already have bought something if their desired product had been available. Rather than losing them forever, encourage them to sign up for your waitlist, then recover your lost revenue with a back-in-stock campaign.
And the best thing is, you can add back-in-stock functionality to your store in just a few minutes with STOQ – no coding or dev work required.
FAQs
What are back-in-stock emails?
Back-in-stock emails are automated emails sent to customers who signed up to receive them because a product they wanted to buy was unavailable at the time. These emails inform the customer that the product is in inventory again, thereby helping the merchant recover revenue that would otherwise have been “lost”. Back-in-stock emails typically include a link to the relevant product page or the store’s checkout.
How can I set up back-in-stock notifications on Shopify so customers automatically get an email when products return?
Shopify doesn't include a native back-in-stock notification system, so you'll need a third-party app like STOQ. Once installed, STOQ adds a 'Notify me when back in stock' button to your out-of-stock product pages. Customers submit their email, and the moment you restock the product in Shopify admin, STOQ automatically sends them an alert — no manual step required.
How do I set up stock notification emails in Shopify to send when items are back in stock?
Install STOQ from the Shopify App Store, create your 'Notify Me' signup widget, then set up your automated email sequence. When you restock a product, STOQ sends the first email immediately, with optional follow-ups at 24 and 48 hours. The complete setup takes few minutes and requires no coding. See the step-by-step walkthrough above.
How can I automate restock notifications in Shopify so customers are emailed as soon as inventory updates?
STOQ connects directly to your Shopify inventory. The moment you change a product's stock from 0 to any positive number in Shopify admin — whether via manual update, CSV import, or a connected 3PL — STOQ detects the change and fires your back-in-stock email sequence automatically.

.webp)